Hoji Soft Serve

Recently, I had the pleasure of visiting Oahu for a short weekend trip. We were fortunate with perfect, sunny weather during our stay. We ate many things, and one thing we really enjoyed was Nana’s Green Tea.

Nana’s Green Tea is in the back of a Japanese food court, Waikiki Yokocho. Their menu is filled with drinks and desserts. The prices are not cheap at all, but the quality is decent. I’d recommend the soft serve or parfait desserts.

We tried both matcha soft serve & hoji soft serve. While everyone is familiar with Instagram-friendly matcha, we were introduced to hoji tea. Hoji is roasted tea that has a more subtle, darker flavor.

I think hoji soft serve could make it big as an Asian dessert. As someone who follows food news, I’ve never come across any hojicha coverage, but matcha is covered all the time. Hoji isn’t as Instagram-friendly (perhaps swirl it with matcha), but the flavor sells itself.

How to use child View Controllers in Swift 4.0 programmatically

I’ve just released my Learn to read Korean app for iPhone. It uses a number of child View Controllers in the home screen. While child View Controllers are not a new thing, it was a new experience for me, and I greatly recommend them to reduce the clutter of your View Controllers.

Here’s a photo of my home screen:

The main view controller consists of a vertical UIScrollView and multiple horizontal scrolling UICollectionViews below. While it’s possible to do it all in one massive View Controller, it’s much better to delegate UICollectionView events to their individual child View Controllers.

The good news is that using child UIViewControllers is super easy. You can use your Storyboard or do it programmatically in your UIViewController files. I opted for the latter as I find it easier to reproduce across Xcode projects.

All you need to do to add a child View Controller is below. I included an optional constraints section.

// Create child VC
let childVC = UIViewController()

// Set child VC
self.addChildViewController(childVC)

// Add child VC's view to parent
self.view.addSubview(childVC.view)

// Register child VC
childVC.didMove(toParentViewController: self)

// Setup constraints for layout
childVC.view.translatesAutoresizingMaskIntoConstraints = false
childVC.view.topAnchor.constraint(equalTo: heroView.bottomAnchor).isActive = true
childVC.view.leftAnchor.constraint(equalTo: self.view.leftAnchor).isActive = true
childVC.view.widthAnchor.constraint(equalTo: self.view.widthAnchor).isActive = true
childVC.view.heightAnchor.constraint(equalToConstant: height).isActive = true

With multiple child VCs (each handling their own UICollectionView events), the code base becomes manageable. In each child View Controller, you can handle customization, such as background color, UILabels, UIButtons, etc.

Another tip I have is to use the UIView’s convert(_:to:) method as necessary. You may need to get the child subview’s position relative to your parent View Controller’s view (such as for an UIViewControllerTransitioningDelegate). The code for that is simple too:

// contrived example label in Child VC to get parent frame
let label = UILabel()
let childViewFrame = label.frame
let frameInParent = label.convert(childViewFrame, to: parentVC.view)

That’s all I wanted to share for today. Don’t be afraid of using child View Controllers to break up your massive View Controllers!

Vertically Scrolling UIImage programmatically

Working on a small side project, I wanted to display images in my view controller view at full device width in a vertical scrolling view. Sounds simple right? The good news is that it is. While you may want to use UITableView for more control, using UIStackView is a simpler way to get up and running fast.

For my sample code, I opted to do it programmatically as it’s easier to copy & paste code than explain what constraints to add in Xcode. Also note that the code presented here is a proof of concept, quick and dirty example (not intended for production).

The steps are easy to understand:

  1. Add a scroll view to your view
            self.scrollView = UIScrollView()
            scrollView.translatesAutoresizingMaskIntoConstraints = false
            view.addSubview(scrollView)
    
            scrollView.topAnchor.constraint(equalTo: view.safeAreaLayoutGuide.topAnchor).isActive = true
            scrollView.bottomAnchor.constraint(equalTo: view.safeAreaLayoutGuide.bottomAnchor).isActive = true
            scrollView.leadingAnchor.constraint(equalTo: view.safeAreaLayoutGuide.leadingAnchor).isActive = true
            scrollView.trailingAnchor.constraint(equalTo: view.safeAreaLayoutGuide.trailingAnchor).isActive = true
  2. Add a stack view to your scroll view
            self.stackView = UIStackView()
            stackView.translatesAutoresizingMaskIntoConstraints = false
            stackView.axis = .vertical
            stackView.spacing = 23.0
            scrollView.addSubview(stackView)
    
            scrollView.addConstraints(NSLayoutConstraint.constraints(withVisualFormat: "H:|[stackView]|", options: NSLayoutFormatOptions.alignAllCenterX, metrics: nil, views: ["stackView": stackView]))
            scrollView.addConstraints(NSLayoutConstraint.constraints(withVisualFormat: "V:|[stackView]|", options: NSLayoutFormatOptions.alignAllCenterX, metrics: nil, views: ["stackView": stackView]))
  3. Add images to your stack view
    stackView.addArrangedSubview(image(filename: "photo1"))

For the full code, read the ViewController on GitHub

Hope this helps you if you’re trying to throw together a quick prototype of vertically scrolling images in iOs.

LA Boba Shops

There is endless boba in Los Angeles. I currently live in Ktown where every block seems to have a boba shop, a patbingsu shop, or both.

It’s hard to rank boba joints, because the drink customization (sugar level) and drinks on the same menu vary so much. There could be a big difference between the house specialty (let’s say rose milk tea) and the random drink (almond milk tea).

I value the quality of the ingredients (made in house with real things instead of powder), the freshness of the pearls (boba), and the flavor profile (not mind-numbingly sweet). I’ve tried many dozens of boba joints in LA, and I usually order large, 50% sugar, and less ice.

Below are places that have consistently good drinks with a sample recommended order. Not every order is your standard PMT (pearl milk tea).

Good

  • Gong Cha
    • QQ Passion Fruit Green Tea (comes with pearls & coconut jelly)
      (fruity & refreshing)
  • Sharetea
    • Taro Fresh Milk Tea with Pearls
      (real taro bits is a plus)
  • Tan-Cha
    • High Mountain Green Tea with Cheese Foam
      (as a cheese foam drink, it is heavier than a PMT)
  • Ten Ren’s Tea Time
    • Honey Milk Tea with Pearls
      (their teas are underrated)
  • Twinkle Brown Sugar (Ozero)
    • Brown Sugar Grass Jelly
      (drinks like a meal)

Decent

  • 7 Leaves Cafe
    • Sea Cream Jasmine Tea with Honey Boba
      (crema top layer)
  • 85C Bakery
    • Sea Salt Mountain Green Tea
      (has a good foam/crema top layer. their boba is bad)
  • Kung Fu Tea
    • Jelly Wow
      (not a traditional PMT, more of a meal)
  • TPumps
    • Mango Passion Peach with Boba
      (tea is very “drinkable”, not the best, but it goes down well. boba is not fresh)
  • Wushiland Boba
    • Jasmine Green Milk Tea with Pearls
      (try 1/2 regular & 1/2 small pearls)

While I don’t inherently favor chains, I’ve found that big chains from Asia are more reliable and consistent with the boba freshness. Gong Cha 9 out of 10 times will have fresh boba, whereas your average LA boba shop will probably not have fresh boba.

Prior Inclination

Earlier this year, Alex Honnold scaled El Capitan without ropes. That was an impressive & dangerous feat by Alex.

What stuck with me is this quote about Alex from Tommy Caldwell:

Alex once told me that he had never fallen completely unexpectedly—meaning without at least some prior inclination that it could happen.

That is amazing and shows that Alex is simply operating at a higher level. I would make the blanket generalization that most climbers have fallen while climbing without anticipating it.

Why this sticks out to me is when I apply it to other fields. Outdoor climbing can easily be a life or death ordeal. Software generally is not life or death during development.

Can you imagine a programmer who writes code that doesn’t crash without the programmer having some prior inclination? That sounds impossible right? Or a slow development cycle.

I’m not saying that programmers need to be able to anticipate every crash ever. But if someone were able to never have their code crash without prior inclination, that’s awesome.

Supporting the iPhone X with Storyboard

There are a ton of guides out there for updating your app(s) to support the iPhone X.

If you create your view programmatically, you can use iOS 11’s safeAreaLayoutGuide. If your app targets iOS 10 or below, you can use the availability condition, #available().

With the Storyboard, one thing I appreciate from Apple is making the safe area layout guide backwards deployable.

Apple told us in WWDC 2017 Session 412 that Storyboards using safe areas are backwards deployable. This means you can switch to using the safe area layout guide in Interface Builder even if you still target iOS 10 and older.

via https://useyourloaf.com/blog/safe-area-layout-guide/

I don’t always use the storyboard for my layouts, but for apps that I need to update, this backwards deployability helps a lot.

Rob Pike’s dream setup

I recently came across a short article on Uses This.

Rob Pike talks about his setup. His response for his dream setup & having stateless devices really intrigued me.

Twenty years ago, you expected a phone to be provided everywhere you went, and that phone worked the same everywhere. At a friend’s house, or a restaurant, or a hotel, or a pay phone, you could pick up the receiver and make a call. You didn’t carry a phone around with you; phones were part of the infrastructure.

– Rob Pike
https://usesthis.com/interviews/rob.pike/

This is hard to imagine today or in the future for computers. A world where you didn’t have to carry around a mobile phone. You simply used the mobile phone wherever you went. For many reasons, what Rob talks about for phones (applied to computers) doesn’t seem likely.

But it’s nice to imagine a world where you didn’t have to update your phone every couple of years. You could rely on a device at home or at work to pick up where you left off, without having to lug something expensive around and keep it charged.

ARKit Impressions

I’ve been working with ARKit recently. I am planning on releasing an AR basketball game when iOS 11 is released.

Here are misc thoughts about working with ARKit:

  • It’s hard to find answers to common questions about doing simple things in ARKit. Searching for SceneKit yields slightly more results, but even that is sparse. The Apple developer SceneKit & ARKit forums don’t appear to have much activity either. So it’s up to StackOverflow & random Internet blog posts
  • Working with ARKit means working with SceneKit. SceneKit is Apple’s framework to make working with 3D assets easier for developers. Working with SceneKit & 3D is something that I’m new to. A lot of the math around position, orientation, euler angles, transforms, etc. can get complex fast when it involves matrix transforms and quaternions.
  • It’s really hard to find assets for DAE/collada. The DAE format is meant to be interchange format for various 3D software to communicate with each other. The reality is that exporting to DAE or converting from one format to DAE is a crapshoot. I’ve used Blender briefly to look at 3d assets, but digging into 3D modeling is a huge time sink for some one looking to get involved in ARKit. I wish there was an online store that focused on selling low poly (<10K), DAE files.
  • Related, working with 3D assets as someone new to 3D assets is very frustrating. The concept of bounds vs scaling as they relate to importing into your SceneKit scene was very challenging (with the 3D model that I imported). If you have your own in-house or contracted 3D modeler, you should get 3D assets that work well with SceneKit, but I had countless issues with off the shelf 3D models & file formats.
  • After you’re able to import your 3D model, modeling the physics geometry can be a challenge. SceneKit allows you to import the geometry for your physics body as-is using ConcavePolyhedron, but you probably don’t want that. I had to manually recreate a basketball hoop using multiple shapes combined into a single SCNNode.
  • ARKit is not all powerful. The main feature that ARKit gives you is horizontal plane detection. Occlusion doesn’t come with ARKit. Expect many apps that deliver an experience reliant on a plane/surface like your desk or the floor.

ARKit is exciting, but don’t expect the world yet. Future ARKit releases & better iOS hardware should provide more compelling experiences. Today, you can expect to play with 3D models on a surface (with surface interaction) or in the air (with limited or no environment interaction).

CLI Cut Visual Option

Something I came across recently was command line text manipulation with a CSV. The way that the list option is passed in is cool.

For demonstration purposed, we have a contrived text document “dummy.txt” that happens to be delimited by the % character. The contents inside the file are:

name%car%temp%color
john%honda%fair%blue
tom%benz%fair%red
ed%bmw%cold%green

To get the first column of data, you can run

cut -d% -f1 dummy.txt

which gives you:

name
john
tom
ed

If you wanted to save the output, the standard command line “>” comes in handy.

To get the columns up to (and including the) 2nd column, you can run

cut -d% -f-2 dummy.txt

which gives you:

name%car
john%honda
tom%benz
ed%bmw

To get the 2nd & 3rd columns, inclusive, you can run

cut -d% -f2-3 dummy.txt

which gives you:

car%temp
honda%fair
benz%fair
bmw%cold

To get the 3rd column onward to the last column, you can run

cut -d% -f3- dummy.txt

which gives you:

temp%color
fair%blue
fair%red
cold%green

The examples above are just for this demo, but I think the hyphen syntax in the list fields option is easy to learn and visually clear (for a CLI interface).

Crosswalk Aides

I recently went on vacation in Europe. When I visit a new place, I try to get a feel for the new environment by walking around everywhere. Things like the OK to cross icon always amuse me since they are different.

London has a ton of history (old buildings), but I found that it exceeded my expectations for modern accessibility. The signage throughout the subway and public areas (train stations, etc) was really easy to follow.

In the UK, cars drive on the left side of the road. This is the opposite from the US. This means people coming from the US have to look on the other side for oncoming traffic while crossing the street.

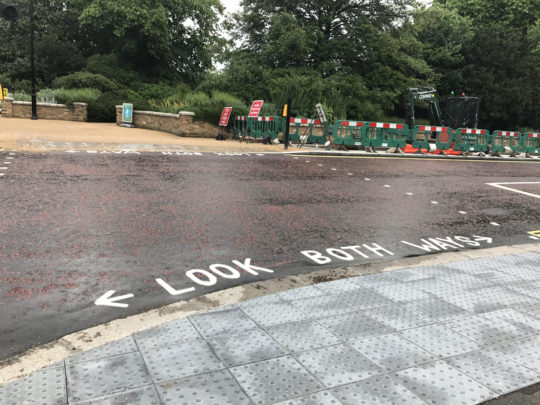
One particularly helpful affordance in London were these painted messages telling you which way to look:

There’s also both ways:

I appreciated these messages since they didn’t have to paint them throughout London. But they did and it helped me make sure I was looking the correct way for traffic.