Convert a Ruby Hash into valid JSON

This post is about how to get a valid JSON (JavaScript Object Notation) snippet from a Ruby Hash.

In the world of Ruby, Ruby loves hashes. It’s great because it allows you to access values with keys. With [cci]require ‘json'[/cci], you can easily parse a JSON formatted string into a Ruby hash with [cci]JSON.parse(json_string)[/cci]. You can easily tell hashes by their hash rockets ([cci]=>[/cci]) and JSON by its usage of colons ([cci]:[/cci]).

[cc]
require ‘json’
animal_count = {“tiger”=>3, “lion”=>2, “dog”=>2, “cat”=>3, “mouse”=>1, “bear”=>1, “frog”=>2, “fish”=>1}
animal_count.class #=> Hash
animal_count.methods #=> :to_json
[/cc]

By using [cci]require ‘json'[/cci], you get access to the [cci]to_json[/cci] method on hashes. Unfortunately, they look like this:

[cc]
json_animals = animal_count.to_json #=> “{\”tiger\”:3, \”lion\”:2, \”dog\”:2, \”cat\”:3, \”mouse\”:1, \”bear\”:1, \”frog\”:2, \”fish\”:1}”
json_animals.class #=> String
[/cc]

If you paste the string [cci]”{\”tiger\”:3,\”lion\”:2,\”dog\”:2,\”cat\”:3,[/cci]
[cci]\”mouse\”:1,\”bear\”:1,\”frog\”:2,\”fish\”:1}”[/cci] into JSON Lint, you’ll find that it’s invalid JSON due to a Parse Error.

The backslash character ([cci]\[/cci]) is there to escape the quotes for serialization (Ruby object to transportable string) and deserialization (string to Ruby object).

The good news is that the solution in IRB is extremely easy.

[cc]
puts json_animals #=> {“tiger”:3,”lion”:2,”dog”:2,”cat”:3,”mouse”:1,”bear”:1,”frog”:2,”fish”:1}
[/cc]

With [cci]puts[/cci], the new return String passes JSON Lint as Valid JSON.

Using [cci]puts[/cci] may seem obvious, but it’s the seemingly small things like this that make all the difference in the world. One is properly escaped but invalid, while the other is valid, usable JSON.

(Thanks to Avi for helping me with this @Flatironschool)

How to count Ruby Array items

While working in Ruby, I often find myself trying to get a count of the number of times each item appears in an array. Below, I’ll show you how to create a Hash that iterates through each item in the array and counts the number of occurrences.

We have an array of [cci]animals[/cci] that we want to count.

[cc]animals = [“tiger”,
“tiger”,
“lion”,
“dog”,
“cat”,
“mouse”,
“bear”,
“frog”,
“tiger”,
“lion”,
“frog”,
“fish”,
“cat”,
“dog”,
“cat”
][/cc]
We can count them up by creating a new Hash.

[cc]animal_count = Hash.new(0)[/cc]

Next, we want to iterate through the [cci]animals[/cci] Array and set the [cci]animal_count[/cci] Key as the animal name & the [cci]animal_count[/cci] Value as the counter.

[cc]animals.each { |animal| animal_count[animal] += 1 }[/cc]

For each [cci]animal[/cci] in [cci]animals[/cci], we’ve either created a new Key / Value pair in [cci]animal_count[/cci] or incremented the Value corresponding to the [cci]animal[/cci] Key.
[cc]puts animal_count
#=> {“tiger”=>3, “lion”=>2, “dog”=>2, “cat”=>3, “mouse”=>1, “bear”=>1, “frog”=>2, “fish”=>1} [/cc]

How to Close a Git Pull Request

With a git workflow, you become used to commands like [cci]git add filename[/cci] and [cci]git commit -m “add filename”[/cci]. When you maintain an open source project and get a pull request, the exact workflow may get murky. How do you review the pull request work? How do you accept the commit if it passes muster?

This post will cover how to review, accept, and close a GitHub pull request.

In our example, we are the creator of a popular open source project called breakfast-sandwich. In our rush to get the product out, we forgot a critical piece – the breakfast sandwich has no cheese! Luckily, our project is open source and we’ve already received a pull request to add cheese to our sandwich.

Here’s the ingredients [cci]list.txt[/cci] file initial state, missing cheese:

[cc]# ingredients list
* english muffin
* eggs
* sausage [/cc]

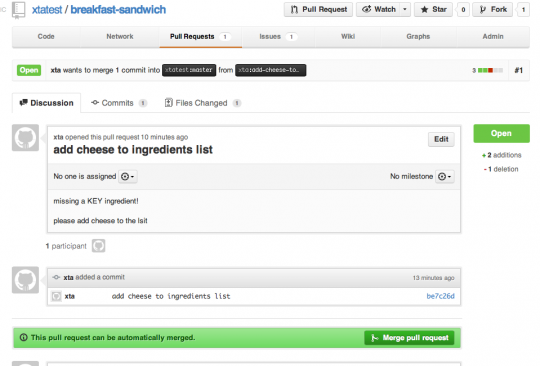
Here’s the pull request on GitHub:
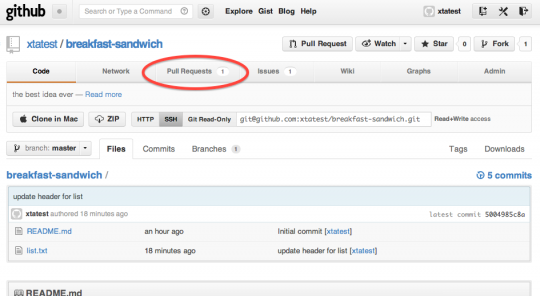
Pull Request

A pull request received

The Pull Request detail

The Pull Request detail

1. Add the fork’s pull request repo as a remote

[cc]$ git remote add xta https://github.com/xta/breakfast-sandwich.git[/cc]

You can verify that the remote [cci]xta[/cci] has been added by running the [cci]git remote[/cci] command.

2. Fetch the git data from remote

[cc]$ git fetch xta
remote: Counting objects: 5, done.
remote: Compressing objects: 100% (3/3), done.
remote: Total 3 (delta 0), reused 3 (delta 0)
Unpacking objects: 100% (3/3), done.
From https://github.com/xta/breakfast-sandwich
* [new branch] add-cheese-to-list -> xta/add-cheese-to-list
* [new branch] master -> xta/master[/cc]

3. Checkout the remote branch

[cc]$ git co xta/master
Note: checking out ‘xta/master’.
You are in ‘detached HEAD’ state. You can look around, make experimental
changes and commit them, and you can discard any commits you make in this
state without impacting any branches by performing another checkout.
If you want to create a new branch to retain commits you create, you may
do so (now or later) by using -b with the checkout command again. Example:
git checkout -b new_branch_name
HEAD is now at be7c26d… add cheese to ingredients list[/cc]

4. Checkout to a new test branch

[cc]$ git co -b “test-add-ingredient”
Switched to a new branch ‘test-add-ingredient'[/cc]

5. Test the current branch

For this step, you would need to perform whatever steps your project deems appropriate before accepting a pull request.

We can open up [cci]list.txt[/cci] and see that it now contains cheese:

[cc]# ingredients list
* english muffin
* eggs
* sausage
* cheese[/cc]

As the updated ingredients from [cci]xta/master[/cci] pass our critiera, we need to merge it back into master branch.

6. Check your feature branch against master to make sure any merge conflicts happen in your feature branch

[cc]$ git rebase master
Current branch test-add-ingredient is up to date.[/cc]

7. Merge feature branch into master

First, switch to master branch:

[cc]$ git co master
Switched to branch ‘master'[/cc]

Then merge the feature branch into master.

[cc]$ git merge test-add-ingredient
Updating 5004985..be7c26d
Fast-forward
list.txt | 3 ++-
1 file changed, 2 insertions(+), 1 deletion(-)[/cc]

8. Push your master onto GitHub

Great job! We’ve reviewed the feature branch, merged it into master locally. So now, we need to make sure the internet has access to our open source breakfast sandwich that includes cheese.

[cc]$ git push
Counting objects: 5, done.
Delta compression using up to 4 threads.
Compressing objects: 100% (3/3), done.
Writing objects: 100% (3/3), 343 bytes, done.
Total 3 (delta 0), reused 0 (delta 0)
To git@github-xtatest:xtatest/breakfast-sandwich.git
5004985..be7c26d master -> master[/cc]

When you look at your GitHub repo, you’ll see that the pull request is now closed. Most importantly, our breakfast sandwich has cheese!
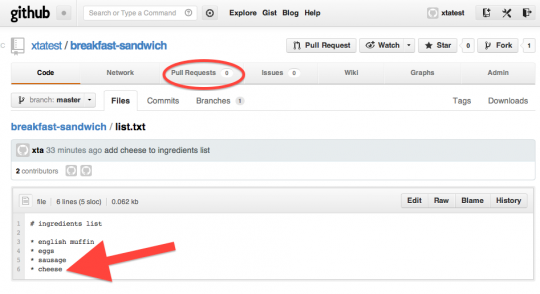
Closed Pull Request

Closed Pull Request

Halloween Bash Profile Generator Demo

In Flatiron School, one of the first things we did was setup our bash environment. Many existing web resources for customizing your .bash_profile involved lots of reading, so I decided to make a tool so that anyone could spend a couple minutes with WYSIWYG instead of an hour reading online discussions.

HalloweenBash, a bash profile generator, was made to be as easy to use as possible. It doesn’t have every possible feature, but it updates instantly with a live preview.

The bash preview box shows what your bash will look like when you copy the text in box #3 into your ~/.bash_profile file. Box #1 and #2 allow you to drag and drop elements and click on color choices, respectively.

In this Screencast, I’ll show you step-by-step how easy it is to use:

If you have any questions or feedback, please don’t hesitate to reach out to me @rexfeng.

HalloweenBash is available on GitHub.

5 Essential Terminal Shortcuts

Terminal screen

The first time you see the Terminal screen, it’s very intimidating. “What am I supposed to do here How do I navigate? What can I type?” Over time, [cci]cd[/cci]-ing and [cci]ls[/cci]-ing will become second nature. Using a Command Line Interface (Terminal) is simply more efficient than leaving the comfortable home position to drag the mouse a few inches.

In OS X, Terminal wraps the Bash (Unix shell) application. I’ve learned some essential Bash shortcuts that will help you save time and be more efficient.

  1. [Tab]
    Command-line completion is amazing. Bash will automatically fill in partially typed commands. If you have a file named “profile-page.html” and hit [Tab] while typing out the first few letters, the rest of the file name will likely be auto completed for you.
  2. [cci]ls -a[/cci]
    While you probably know about typing [cci]ls[/cci] in a directory to show all files, typing [cci]ls -a[/cci] will let Bash show you all files (including the hidden ones) that Finder won’t show you by default.
  3. [cci]touch [/cci][file_name]
    The touch command takes in a file_name argument that is the file name created on the spot.
  4. [Cmd+T]
    Create tabs with [Cmd+T] Do you remember the first time you tried Firefox several years ago? Tabs are your friends.
  5. [cci]open [/cci] [target]
    The open command followed by the folder or file name will let you open up files in their default application.

Working out of the Terminal is amazing. If you’re interested in more power tips, I’d recommend reading about alias and subl symlink.

10 Tips for JavaScript Beginners

This JavaScript 101 post is based on the presentation JavaScript Syntax by Ynon Perek.

Puzzle pieces By liza31337

Puzzle pieces By liza31337

Ynon‘s slides do a great job covering key JavaScript fundamentals:

Values
1. Undefined refers to anything that hasn’t been assigned a value.
2. In JS, false is made up of false, null, unidentified, “”, 0, and NaN.
3. Everything else is truthy in JS.

Naming Conventions
4. Identifiers start with letters, _, or $. They are followed by letters, digits, _, or $.
5. Variable names are lowercased, with words split by _. Function names are CamelCased.

Variables
6. JavaScript has function scope.
7. Outside of functions, any variables defined have global scope and is accessible anywhere in the application.

Objects
8. Objects are a collection of key, value pairs.
9. Functions are normal JS objects.
10. function foo() {} is equivalent to var foo = function() {};

JavaScript and JQuery are powerful tools for implementing web page user interaction. The best way to get started is to try writing some JavaScript and look up anything that you’re not sure about.

Discovering Columbus by Tatsu Nishi

Some Columbus Circle pics:

Waiting in Line

Waiting in Line

Climbing the stairs

Climbing the stairs

View towards Broadway

View towards Broadway

View of the entrance line below

View of the entrance line below

View of the entrance line below

View of the entrance line below

View of Trump Tower

View of Trump Tower

The man himself, in his living room

The man himself, in his living room

View out the living room window

View out the living room window

American wallpaper

American wallpaper

Another stair view

Another stair view

All pics taken with the old school iPhone 4.

Google Chelsea Free Wi-Fi: Mapped

Google is notorious for providing their employees free lunch.

Beginning today, certain Chelsea MTA subway stops have free Wi-FI.

Per Transit Wireless (the company Google teamed up with to offer the Wi-Fi), the following locations have Wi-Fi:

Let’s looked at these MTA stops mapped along with Google’s NYC headquarters:

Probably not a coincidence that these stops are the only MTA ones near Google.