Category Archives: Programming

Apple Vision Pro Demo Impressions

I tried out the Apple Vision Pro (AVP) hardware in an Apple store today. The ball was in Apple’s court. I really wanted to be impressed by the hardware and put me over the edge to pick one up and develop apps for it. I’ve released Day 1 apps for the Apple Watch & ARKit (iOS 11), and I believe in the future of AR for productivity.

Not Sharp

Unfortunately, when I wore the AVP, the content (text, images, etc.) was not razor sharp. I could use the device and navigate the OS without an issue, but I was expecting next-gen sharpness on the AVP displays.

My guess is I could try different distances (closer or further) from the screen to find the distance where all the content is sharp and crisp. Probably try different light seals. I couldn’t achieve the level of sharpness that I expect from any 2020 device (phone, HD monitor, etc).

Also, there was an opening at the bottom of my headset (towards my nose). I thought the light seals were supposed to block 360 degrees of light around the headset and not leave a small gap. That gap was normal per the Apple rep.

Demo

Apple did a great job with the demo. The demo was seated (smart) and focused on VR content, not passthrough use cases.

The OS (visionOS) was simple to use. Pinching to drag around or press buttons worked fine with hand gestures. When I tried to resize windows (bottom corners) or use two hands to pull apart, I ran into problems with certain apps where it wouldn’t work.

Content (2D vs 3D)

My imagined ideal use case would be having several large macOS screens in front of me to get work done. However, Apple marketing seems to be focused on entertainment (big TV in front of you) as their selling point.

The problem (in my opinion) is that the content was not great. Spatial content, shot on what I presumed are iPhone 15 Pro Maxes or AVPs, seemed low resolution to me. Enlarging an iPhone photo to fill up your entire room’s wall doesn’t work that well. It lacked detail. Even viewing a Panorama (shot on iPhone? not sure), the resolution was not great when viewed at such a large size.

Part of the demos included immersive environments. The environments were impressive since they were built natively for the device and 3D rendered. Viewing a photo from the moon environment was great since the nearby 3D rocks on the ground really sell the illusion.

I personally felt the other content fell apart. Spatial videos (shot with iPhone 15 PM?) were fun but it didn’t feel immersive to me since moving around lacked the convincing parallax experience you get from viewing things in your every day life.

While internet AVP users seem to enjoy viewing 2D movies on a giant, virtual screen, I think there is a huge opportunity for companies to build 3D immersive environments or games for users to be in (and interact with). Using the AVP’s state of the art hardware to view 2D images is like watching television without sound – a missed opportunity.

Takeaway

Despite the hardware issues (I suspect the light seal), I’d be interested in making AR apps for the AVP. Paying almost $4K to buy a dev kit and develop for Apple is a tough sell for an indie developer. I honestly think Apple should have a program for developers to borrow AVPs and build apps.
Updating web app from Rails 4 to Rails 7

A few months ago, certbot gave me the warning “Your system is not supported by certbot-auto anymore.”. With my Rails 4 app running on old Ubuntu 14.04, it was time to update the app & environment.

Since I’m using Digital Ocean’s droplets, it was easy to spin up a new droplet, setup the new droplet, and then destroy the old droplet. This is way better than operating in situ.

This blog post will provide a high level overview of update steps & pitfalls encountered.

  1. Spin up a Ruby on Rails (v7.0.4.2, OS Ubuntu 22.04) droplet https://marketplace.digitalocean.com/apps/ruby-on-rails This also involved setting up a SSH key to access the new droplet server.

  2. Exfiltrate the example Rails 7 app from the server to my local machine scp -r root@{SERVER_IP}:/home/rails/example .

  3. Create a new private GitHub repo for this example Rails 7 app

  4. Run the new example Rails 7 app locally This step should be super simple, but it was not. Getting RVM to run Ruby 3.2.0 with OpenSSL was not trivial on my Intel Mac. Here’s what I ran to setup Ruby 3.2.0 locally:

    sudo -i
    cd /usr/local/src
    curl -O https://www.openssl.org/source/openssl-1.0.2t.tar.gz
    tar xzf openssl-1.0.2t.tar.gz
    cd openssl-1.0.2t
    ./Configure darwin64-x86_64-cc
    make
    make install

    rvm reinstall 3.2.0 --with-openssl-dir=/usr/local/ssl

  5. In the new Rails 7 app, I moved my psql DB migrations over by hand. I copied the files and had to update the ActiveRecord::Migration with ActiveRecord::Migration[7.0].

  6. Draw the rest of the owl. I had to port lots of Rails files over from my Rails 4 to the target Rails 7 app.

    I ran into an issue with a model validation callback. To fix my issue, I created a migration to add uniqueness validation at the postgres layer and removed the uniqueness check in my model.

    This also include various site fixes. Such as Open Street Map tiles, using 3rd party APIs, and Font Awesome icons.

  7. Setup deployment to the server using Capistrano.

    Setting up Capistrano with Puma on Digital Ocean was not trivial at all. I followed this guide by Matthew Hoelter https://www.matthewhoelter.com/2020/11/10/deploying-ruby-on-rails-for-ubuntu-2004.html

    In my config/deploy.rb file, I had to add this set :branch, :main

    In my root Capfile, I had to use install_plugin Capistrano::Puma::Systemd due to using Puma 5.6.5.

    After a ton of trial and error, I had setup my nginx config at /etc/nginx/sites-available/rails.

    There was a ton of issues with the .sock file from Puma not getting generated.

    Setting up the secret_key_base is a newer Rails convention. Luckily Matthew’s blog post goes into detail on how to set it up in /etc/environment

    Using systemctl, I got puma setup to run the command bundle exec puma -C /home/rails/apps/[APP_NAME]/shared/puma.rb.

    Also, due to running on Digital Ocean, I had to update permissions for the rails user. cd /home; chmod o=rx rails. See Stack Overflow for details https://stackoverflow.com/questions/70028324/nginx-permission-denied-accessing-puma-socket-that-does-exist-in-the-correct-loc Without running this, I was getting a 502 (Bad Gateway) error, even though everything else was setup. I can see traffic in my nginx.access.log, but I was still getting the 502 (before running this command).

  8. Move psql data over. This step is going to vary a lot on your setup. I was able to run pg_dump to export my data and import data using psql APP_NAME_production < latest_pg_dump.sql.

  9. Update A record. In order to point my domain to my new droplet, I went into Digital Ocean and updated the A record from my old IP to my new IP. This is going to vary depending who you’re using for domain names.

  10. Run certbot. Running certbot for SSL was super easy. https://certbot.eff.org/instructions?ws=nginx&os=ubuntufocal

  11. Destroy old droplet. When you’ve verified everything is working with your new Rails 7 app, you can destroy the old droplet in Digital Ocean.

My app, GeoGraph, is now running on Rails 7 and lets anyone bookmark their location.

zsh PS1 setup

macOS Catalina uses zsh as the new default shell (instead of bash) in Terminal. This means that many people will be looking to re-setup their CLI with ~/.zshrc instead of ~/.bash_profile.

While customizing my .zshrc was a hassle, it was also an opportunity to clean up my profile and remove legacy settings.

Zsh offers an optional right side prompt, but I only used the left side prompt for now.

Here are some misc tips that I’ve found helpful:

  • For basic PS1 exports (time/date, current dir, user, etc), you can find examples here. Things like %D for the current date, %~ for the current directoy, and more.
  • In your PS1 export, you can start color formatting with %F{117} and end color formatting with %f. Replace 117 with whatever color your desire. You can find color codes here.
  • You can make your tab auto completion case insensitive (ignore case) by adding:
    zstyle ':completion:*' matcher-list 'm:{[:lower:]}={[:upper:]}'
    autoload -Uz compinit && compinit -i
  • You can show your current git branch with:
    autoload -Uz vcs_info
    precmd() { vcs_info }
    zstyle ':vcs_info:git:*' formats '(%b)'
    setopt prompt_subst

    Note: you also need to add $vcs_info_msg_0_ in your PS1 export line.

I’ve thought about creating a zshrc WYSIWYG tool, ala Halloween Bash, but I’ve shelved those plans since there’s only so much time in a day. With macOS Catalina inevitable for macOS users, more and more people are going to be looking for easy ~/.zshrc customization.

How to install iOS 13 beta (for developers)

With an Apple developer account, you can install the iOS 13 beta. Warning: you should backup your existing device before installing the iOS 13 beta, and “install only on systems you are prepared to erase if necessary.”

From the Apple Developer Download page, you can find the Restore Images. Find your device among the list at https://developer.apple.com/download/#ios-restore-images-iphone-new to download the .ipsw

Next use iTunes & follow Apple’s guide (Installation Using the Restore Image)

  • Make sure you are running the latest version of iTunes on your Mac.
  • Open iTunes on your Mac.
  • Connect your iOS device to your computer with the cable that came with your device.
  • If you’re prompted for your device passcode or to Trust This Computer, follow the onscreen steps. If you forget your passcode, help is available.
  • Select your iOS device when it appears in iTunes.
  • In the Summary panel, hold the Option key and click the Check for Update button.
  • Select the iOS beta software restore image and click Open to start the installation.
  • After installing the beta, your device will reboot and will require a network connection to complete activation.

Follow the on screen instructions and you’ll have iOS 13 beta running on your device.

Note: I ran into an error “Can’t install the software because it is not currently available from the Software Update server”. I waited for my iPhone to fully boot up and I’m able to use iOS 13 beta (despite that error message).

Overall, the experience wasn’t too bad. This is a developer beta and not intended for widespread public distribution. If you are interested in the public beta for iOS 13, you can sign up here https://beta.apple.com/sp/betaprogram/

iOS Developer iPhone (Dec 2018)

As an indie iOS app developer, keeping up with Apple’s hardware can get expensive fast. From the Mac to the iPhones and iPads.

I’m focusing on native iPhone apps and currently use an iPhone 7 as my daily driver. I’m considering getting a new iPhone and want to find the right balance between 1.) phone size I want to use daily and 2.) phone is optimal for App Store Connect previews (videos) & screenshots.

Since I’m an AR app developer, having iPhone hardware is essential (the Simulator doesn’t cut it).

Looking at the state of iPhone hardware today (Dec 2018), some quick Googling shows that the iPhone 7, 7+/8+, and X form factors are the most common in the US.

When we look at Apple’s App preview & screenshot guidelines, it tells us that the 5.5 inch (iPhone 8+, etc) form factor is required (screenshots) and recommended (app previews).

For 2019, my guess is that supporting the 5.5 inch (8+) form factor and the 5.8 inch (X/XS) on App Store Connect would give me the most bang for my buck. It would be nice to have both a XS & XS Max to test with, but that’s way out of my budget.

Curiously enough, the app preview video resolutions are the same across the X line (X, XS, XS Max, XR at 886 x 1920 pixels (when portrait). The video resolution is bigger at 1080 x 1920 pixels for the plus line (8+, etc).

Using App Store Connect, I was able to manually verify the different screenshot upload resolutions for the iPhone XS Max (1242 × 2688), iPhone XS (1125 × 2436), and iPhone 8+ (1242 × 2208). It seems like there is no point to try to take or upload iPhone XR screenshots.

In summary, the iPhone plus (8+, etc) line is the most important for app previews & screenshots. After that, the XS & XS Max (in that order) will give you more App Store Connect coverage with diminishing returns.

iOS 12 Siri Shortcuts

The latest update (v1.3.6) of my iPhone app, Power Focus, passed app review today! The App Store review turnaround is amazing nowadays. Super quick.

My app includes minimal iOS 12 Siri Shortcuts support. Watching the WWDC session, there’s two ways to add Siri Shortcuts support: NSUserActivity & Intents. I went with the former since I didn’t need custom Siri UI.

Of different online resources, Anton’s medium post was really helpful as it covers the essentials of using NSUserActivity. With NSUserActivity, the important parts are donating Shortcuts during app usage and handling them in your App Delegate. That’s it.

The experience of implementing minimal iOS 12 Siri Shortcuts was painless and I would recommend your app using NSUserActivity to inform iOS when key actions occur.

Using SVG / PDF assets in your iOS app

This guide covers a simple way to use SVG (Scalable Vector Graphics) assets in your iOS app. This was tested on macOS High Sierra 10.13 with Xcode 9.4 and Swift 4.

There are many websites where you can find SVG icons. Check out Material or ionicons

  1. Install homebrew & python3 for macOS (if you don’t have it)
  2. Install cairosvg. The code below installs various dependencies
    brew install python3 cairo pango gdk-pixbuf libffi
    
    pip3 install cairosvg
  3. Convert your SVG icons to PDF files. Make sure to navigate to the location of your SVG icon files. Run this command for each icon file (with the relevant *.svg & *.pdf input / output file name):
    cairosvg icon.svg -o icon.pdf
  4. Drag your PDF files into your Xcode Assets.xcassets folder
  5. Adjust the settings for each icon in your xcassets. You may want to adjust:
    1. Name – this is important as you will refer to this in your Swift code to use the icon
    2. Set ‘Render As’ to ‘Template Image’
    3. Check the box for ‘Resizing – Preserve Vector Data’
    4. Set ‘Scales’ to ‘Single Scale’
  6. Use your icon in your app. I did this programmatically in Swift, and this works in your ViewController. Make sure to update the ‘iconName’ to match what is in your xcassets for your icon file.
    if let icon = UIImage(named: "iconName") {
        let image = UIImageView(image: icon)
        image.translatesAutoresizingMaskIntoConstraints = false
        image.tintColor = UIColor.blue
        view.addSubview(image)
    
        NSLayoutConstraint.activate([
            image.leadingAnchor.constraint(equalTo: view.leadingAnchor),
            image.centerYAnchor.constraint(equalTo: view.centerYAnchor),
            image.widthAnchor.constraint(equalToConstant: 24),
            image.heightAnchor.constraint(equalToConstant: 24),
            ])
    }
  7.  That’s it. Your SVG file was converted to a PDF file, added into your Xcode assets, and called from your ViewController!

Git Config Email String

This is about a simple problem that is obvious after the fact. I was having an issue with my commits on github.com not being linked to my github account. It seemed like I had set everything up (git email configured locally & e-mail set in my github.com account), but it wasn’t working.

On a mac, you probably know you can set your git user e-mail this way:

git config --global user.email name@domain.com

Following the github guide (https://help.github.com/articles/setting-your-commit-email-address-in-git/), I included quotes when setting my git config email.

git config --global user.email "name@domain.com"

It turns out that was a mistake for me since my commits were being associated with “name@domain.com” instead of name@domain.com. Note: the inclusion vs exclusion of quote characters.

After running the git config command above without quotes, I was able to properly link my commits on github to my github user profile.

Intro to Computer Vision

I’m new to computer vision and a lot of the basic concepts are very interesting. As an iOS developer, my interests comes from using CoreML & Apple’s Vision in apps to improve the user experience.

Two common tasks are classification and object detection. Classification allows you to detect dominant objects present in an image. For example, classification can tell you that photo is probably of a car.

Object detection is much more difficult since it not only recognizes what objects are present, but also detects where they are in the image. This means that object detection can tell you that there is probably a car within these bounds of the image.

What’s important is that the machine learning model runs in an acceptable amount of time. Either asynchronous in the background or in real time. Apple provides a listing of sample models for classification at https://developer.apple.com/machine-learning/.

For real time object detection, TinyYOLO is an option, even if the frame rate is not near 60 fps today. Other real time detection models like YOLO or R-CNN are not going to provide a sufficient experience on mobile devices today.

One other interesting thing I came across is the PASCAL Visual Object Classes (VOC). These are common objects used for benchmarking object classification.

For 2012, the twenty object classes that have been selected were:

  • Person: person Animal: bird, cat, cow, dog, horse, sheep
  • Vehicle: aeroplane, bicycle, boat, bus, car, motorbike, train
  • Indoor: bottle, chair, dining table, potted plant, sofa, tv/monitor

These are common objects used to train classification models.

Computer vision used with machine learning has a tremendous amount of potential. Whether used with AR or other use cases, they can provide a compelling user experience beyond Not Hotdog.

How to use child View Controllers in Swift 4.0 programmatically

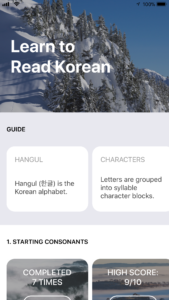
I’ve just released my Learn to read Korean app for iPhone. It uses a number of child View Controllers in the home screen. While child View Controllers are not a new thing, it was a new experience for me, and I greatly recommend them to reduce the clutter of your View Controllers.

Here’s a photo of my home screen:

The main view controller consists of a vertical UIScrollView and multiple horizontal scrolling UICollectionViews below. While it’s possible to do it all in one massive View Controller, it’s much better to delegate UICollectionView events to their individual child View Controllers.

The good news is that using child UIViewControllers is super easy. You can use your Storyboard or do it programmatically in your UIViewController files. I opted for the latter as I find it easier to reproduce across Xcode projects.

All you need to do to add a child View Controller is below. I included an optional constraints section.

// Create child VC
let childVC = UIViewController()

// Set child VC
self.addChildViewController(childVC)

// Add child VC's view to parent
self.view.addSubview(childVC.view)

// Register child VC
childVC.didMove(toParentViewController: self)

// Setup constraints for layout
childVC.view.translatesAutoresizingMaskIntoConstraints = false
childVC.view.topAnchor.constraint(equalTo: heroView.bottomAnchor).isActive = true
childVC.view.leftAnchor.constraint(equalTo: self.view.leftAnchor).isActive = true
childVC.view.widthAnchor.constraint(equalTo: self.view.widthAnchor).isActive = true
childVC.view.heightAnchor.constraint(equalToConstant: height).isActive = true

With multiple child VCs (each handling their own UICollectionView events), the code base becomes manageable. In each child View Controller, you can handle customization, such as background color, UILabels, UIButtons, etc.

Another tip I have is to use the UIView’s convert(_:to:) method as necessary. You may need to get the child subview’s position relative to your parent View Controller’s view (such as for an UIViewControllerTransitioningDelegate). The code for that is simple too:

// contrived example label in Child VC to get parent frame
let label = UILabel()
let childViewFrame = label.frame
let frameInParent = label.convert(childViewFrame, to: parentVC.view)

That’s all I wanted to share for today. Don’t be afraid of using child View Controllers to break up your massive View Controllers!